Wednesday, January 13, 2010

ఉజ్ట్

0 comments


A unijunction transistor (UJT) is an electronic semiconductor device that has only one junction. The UJT has three terminals: an emitter (E) and two bases (B1 and B2). The base is formed by lightly doped n-type bar of silicon. Two ohmic contacts B1 and B2 are attached at its ends. The emitter is of p-type and it is heavily doped. The resistance between B1 and B2, when the emitter is open-circuit is called interbase resistance.

There are two types of unijunction transistor:

* The original unijunction transistor, or UJT, is a simple device that is essentially a bar of N type semiconductor material into which P type material has been diffused somewhere along its length, defining the device parameter η. The 2N2646 is the most commonly used version of the UJT.


* The programmable unijunction transistor, or PUT, is a close cousin to the thyristor. Like the thyristor it consists of four P-N layers and has an anode and a cathode connected to the first and the last layer, and a gate connected to one of the inner layers. They are not directly interchangeable with conventional UJTs but perform a similar function. In a proper circuit configuration with two "programming" resistors for setting the parameter η, they behave like a conventional UJT. The 2N6027 is an example of such a device.

The UJT is biased with a positive voltage between the two bases. This causes a potential drop along the length of the device. When the emitter voltage is driven approximately one diode voltage above the voltage at the point where the P diffusion (emitter) is, current will begin to flow from the emitter into the base region. Because the base region is very lightly doped, the additional current (actually charges in the base region) causes conductivity modulation which reduces the resistance of the portion of the base between the emitter junction and the B2 terminal. This reduction in resistance means that the emitter junction is more forward biased, and so even more current is injected. Overall, the effect is a negative resistance at the emitter terminal. This is what makes the UJT useful, especially in simple oscillator circuits.

Unijunction transistor circuits were popular in hobbyist electronics circuits in the 1970's and early 1980's because they allowed simple oscillators to be built using just one active device. Later, as Integrated Circuits became more popular, oscillators such as the 555 timer IC became more commonly used.

In addition to its use as the active device in relaxation oscillators, one of the most important applications of UJTs or PUTs are to trigger thyristors (SCR, TRIAC, etc.). In fact, a DC voltage can be used to control a UJT or PUT circuit such that the "on-period" increases with an increase in the DC control voltage. This application is important for large AC current control.

BJT

0 comments

A bipolar (junction) transistor (BJT) is a three-terminal electronic device constructed of doped semiconductor material and may be used in amplifying or switching applications. Bipolar transistors are so named because their operation involves both electrons and holes. Charge flow in a BJT is due to bidirectional diffusion of charge carriers across a junction between two regions of different charge concentrations. This mode of operation is contrasted with unipolar transistors, such as field-effect transistors, in which only one carrier type is involved in charge flow due to drift. By design, most of the BJT collector current is due to the flow of charges injected from a high-concentration emitter into the base where they are minority carriers that diffuse toward the collector, and so BJTs are classified as minority-carrier devices.

FET

0 comments

The field-effect transistor (FET) relies on an electric field to control the shape and hence the conductivity of a channel of one type of charge carrier in a semiconductor material. FETs are sometimes called unipolar transistors to contrast their single-carrier-type operation with the dual-carrier-type operation of bipolar (junction) transistors (BJT). The concept of the FET predates the BJT, though it was not physically implemented until after BJTs due to the limitations of semiconductor materials and the relative ease of manufacturing BJTs compared to FETs at the time.

Friday, January 8, 2010

How does a transistor work?

0 comments

The design of a transistor allows it to function as an amplifier or a switch. This is accomplished by using a small amount of electricity to control a gate on a much larger supply of electricity, much like turning a valve to control a supply of water.

Transistor terminalsTransistors are composed of three parts – a base, a collector, and an emitter. The base is the gate controller device for the larger electrical supply. The collector is the larger electrical supply, and the emitter is the outlet for that supply. By sending varying levels of current from the base, the amount of current flowing through the gate from the collector may be regulated. In this way, a very small amount of current may be used to control a large amount of current, as in an amplifier. The same process is used to create the binary code for the digital processors but in this case a voltage threshold of five volts is needed to open the collector gate. In this way, the transistor is being used as a switch with a binary function: five volts – ON, less than five volts – OFF.

TransistorsSemi-conductive materials are what make the transistor possible. Most people are familiar with electrically conductive and non-conductive materials. Metals are typically thought of as being conductive. Materials such as wood, plastics, glass and ceramics are non-conductive, or insulators. In the late 1940’s a team of scientists working at Bell Labs in New Jersey, discovered how to take certain types of crystals and use them as electronic control devices by exploiting their semi-conductive properties.Most non-metallic crystalline structures would typically be considered insulators. But by forcing crystals of germanium or silicon to grow with impurities such as boron or phosphorus, the crystals gain entirely different electrical conductive properties. By sandwiching this material between two conductive plates (the emitter and the collector), a transistor is made. By applying current to the semi-conductive material (base), electrons gather until an effectual conduit is formed allowing electricity to pass The scientists that were responsible for the invention of the transistor were John Bardeen, Walter Brattain, and William Shockley. Their Patent was called: “Three Electrode Circuit Element Utilizing Semiconductive Materials.”

The Transistor

0 comments

The First Transistor
The first point contact transistor made use of the semiconductor germanium. Paper clips and razor blades were used to make the device.


In 1947, John Bardeen and Walter Brattain, working at Bell Telephone Laboratories, were trying to understand the nature of the electrons at the interface between a metal and a semiconductor. They realized that by making two point contacts very close to one another, they could make a three terminal device - the first "point contact" transistor.

They quickly made a few of these transistors and connected them with some other components to make an audio amplifier. This audio amplifier was shown to chief executives at Bell Telephone Company, who were very impressed that it didn't need time to "warm up" (like the heaters in vacuum tube circuits). They immediately realized the power of this new technology.

This invention was the spark that ignited a huge research effort in solid state electronics. Bardeen and Brattain received the Nobel Prize in Physics, 1956, together with William Shockley, "for their researches on semiconductors and their discovery of the transistor effect." Shockley had developed a so-called junction transistor, which was built on thin slices of different types of semiconductor material pressed together. The junction transistor was easier to understand theoretically, and could be manufactured more reliably.

Diodes

0 comments


Here's another installer friendly component you should always have handy. Blocking diodes (1N4001/L) are one way valves used in electrical circuits. These are very simple devices that are often real time savers. Other than the amperage rating of the diode, there are only three basic things to remember:

1. Cathode (side with the stripe)
2. Anode (side without the stripe)
3. Anytime the cathode is more positive than the anode, no current will flow.

Resistors

0 comments
Resistors, like diodes and relays, are another of the electronic parts that should have a section in the installer's parts bin. They have become a necessity for the mobile electronics installer, whether it be for door locks, praking lights, timing circuits, remote starts, LED's, or just to discharge a stiffening capacitor.

Resistors "resist" the flow of electrical current. The higher the value of resistance (measured in ohms) the lower the current will be.

Resistors are color coded. To read the color code of a common 4 band 1K ohm resistor with a 5% tolerance, start at the opposite side of the GOLD tolerance band and read from left to right. Write down the corresponding number from the color chart below for the 1st color band (BROWN). To the right of that number, write the corresponding number for the 2nd band (BLACK) . Now multiply that number (you should have 10) by the corresponding multiplier number of the 3rd band (RED)(100). Your answer will be 1000 or 1K. It's that easy.

* If a resistor has 5 color bands, write the corresponding number of the 3rd band to the right of the 2nd before you multiply by the corresponding number of the multiplier band. If you only have 4 color bands that include a tolerance band, ignore this column and go straight to the multiplier.

1K Resistor
The tolerance band is usually gold or silver, but some may have none. Because resistors are not the exact value as indicated by the color bands, manufactures have included a tolorance color band to indicate the accuracy of the resistor. Gold band indicates the resistor is within 5% of what is indicated. Silver = 10% and None = 20%. Others are shown in the chart below. The 1K ohm resistor in the example (left), may have an actual measurement any where from 950 ohms to 1050 ohms.

If a resistor does not have a tolerance band, start from the band closest to a lead. This will be the 1st band. If you are unable to read the color bands, then you'll have to use your multimeter. Be sure to zero it out first!


top of page Resistor Color Codes
Band Color 1st Band # 2nd Band # *3rd Band # Multiplier x Tolerances ± %
Black 0 0 0 1
Brown 1 1 1 10 ± 1%
Red 2 2 2 100 ± 2 %
Orange 3 3 3 1000
Yellow 4 4 4 10,000
Green 5 5 5 100,000 ± 0.5 %
Blue 6 6 6 1,000,000 ± 0.25 %
Violet 7 7 7 10,000,000 ± 0.10 %
Grey 8 8 8 100,000,000 ± 0.05 %
White 9 9 9 1,000,000,000
Gold 0.1 ± 5 %
Silver 0.01 ± 10 %
None ± 20 %

Definition of Embedded Systems

0 comments
Using the term "Embedded Systems" in our name is confusing to some. In this case, people either have no idea what the term means - or they have a very strict definition in mind, such as "assembly language on a chip". But the work that we do is so much broader than that!

Printed with permission, the following is the definitions stated by The Institution of Electrical Engineers: "A general-purpose definition of embedded systems is that they are devices used to control, monitor or assist the operation of equipment, machinery or plant. "Embedded" reflects the fact that they are an integral part of the system. In many cases their embeddedness may be such that their presents is far from obvious to the casual observer and even the more technically skilled might need to examine the operations of a piece of equipment for some time before being able to conclude that an embedded control system was involved in its function. At the other extreme, a general-purpose computer may be used to control the operations of a large complex processing plant, and its presence will be obvious."

This is a perfect description of the work that SSI can do. On the low-end side, we have written software to control car engines and DSL modems. On the high end, we write Windows based software to control a Printing Press inspection system or run an Optical Tweezer.

Wednesday, January 6, 2010

Electronics

0 comments

Electronics is that branch of science and technology which makes use of the controlled motion of electrons through different media and vacuum. The ability to control electron flow is usually applied to information handling or device control. Electronics is distinct from electrical science and technology, which deals with the generation, distribution, control and application of electrical power. This distinction started around 1906 with the invention by Lee De Forest of the triode, which made electrical amplification possible with a non-mechanical device. Until 1950 this field was called "radio technology" because its principal application was the design and theory of radio transmitters, receivers and vacuum tubes.

Most electronic devices today use semiconductor components to perform electron control. The study of semiconductor devices and related technology is considered a branch of physics, whereas the design and construction of electronic circuits to solve practical problems come under electronics engineering. This article focuses on engineering aspects of electronics.

0 comments

Describing a design:

In VHDL an entity is used to describe a hardware module.

An entity can be described using,

1. Entity declaration.

2. Architecture.

3. Configuration

4. Package declaration.

5. Package body.

Let’s see what are these?

Entity declaration:

It defines the names, input output signals and modes of a hardware module.

Syntax:
entity entity_name is
Port declaration;
end entity_name;

An entity declaration should starts with ‘entity’ and ends with ‘end’ keywords.

Ports are interfaces through which an entity can communicate with its environment. Each port must have a name, direction and a type. An entity may have no port declaration also. The direction will be input, output or inout.

In

Port can be read

Out

Port can be written

Inout

Port can be read and written

Buffer

Port can be read and written, it

can have only one source.

Architecture:

It describes the internal description of design or it tells what is there inside design. Each entity has atleast one architecture and an entity can have many architecture. Architecture can be described using structural, dataflow, behavioral or mixed style. Architecture can be used to describe a design at different levels of abstraction like gate level, register transfer level (RTL) or behavior level.

Syntax:

architecture architecture_name of entity_name
architecture_declarative_part;
begin
Statements;
end architecture_name;

Here we should specify the entity name for which we are writing the architecture body. The architecture statements should be inside the begin and end keyword. Architecture declarative part may contain variables, constants, or component declaration.

Configuration:

If an entity contains many architectures and any one of the possible architecture binding with its entity is done using configuration. It is used to bind the architecture body to its entity and a component with an entity.

Syntax:

    configuration configuration_name of entity_name is
block_configuration;
end configuration_name.


Block_configuration defines the binding of components in a block. This can be written as

    for block_name
component_binding;
end for
;

block_name is the name of the architecture body. Component binding binds the components of the block to entities. This can be written as,

    for component_labels:component_name
block_configuration;
end for;

Package declaration:

Package declaration is used to declare components, types, constants, functions and so on.

Syntax:

package package_name is
Declarations;
end package_name;


Package body:

A package body is used to declare the definitions and procedures that are declared in corresponding package. Values can be assigned to constants declared in package in package body.

Syntax:

package body package_name is
Function_procedure definitions;
end package_name;


The internal working of an entity can be defined using different modeling styles inside architcture body. They are

1. Dataflow modeling.

2. Behavioral modeling.

3. Structural modeling.

Structure of an entity:

Let’s try to understand with the help of one example.

Dataflow modeling:

In this style of modeling, the internal working of an entity can be implemented using concurrent signal assignment.

Let’s take half adder example which is having one XOR gate and a AND gate.
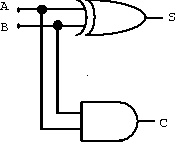
Library IEEE;
use IEEE.STD_LOGIC_1164.all;

entity ha_en is
port (A,B:in bit;S,C:out bit);
end ha_en;

architecture ha_ar of ha_en is
begin
S<=A xor B;
C<=A and B;

end ha_ar
;

Here STD_LOGIC_1164 is an IEEE standard which defines a nine-value logic type, called STD_ULOGIC. use is a keyword, which imports all the declarations from this package. The architecture body consists of concurrent signal assignments, which describes the functionality of the design. Whenever there is a change in RHS, the expression is evaluated and the value is assigned to LHS.

Behavioral modeling:

In this style of modeling, the internal working of an entity can be implemented using set of statements.

It contains:

  • Process statements

  • Sequential statements

  • Signal assignment statements

  • Wait statements

Process statement is the primary mechanism used to model the behavior of an entity. It contains sequential statements, variable assignment (:=) statements or signal assignment (<=) statements etc. It may or may not contain sensitivity list. If there is an event occurs on any of the signals in the sensitivity list, the statements within the process is executed.

Inside the process the execution of statements will be sequential and if one entity is having two processes the execution of these processes will be concurrent. At the end it waits for another event to occur.


library
IEEE;
use IEEE.STD_LOGIC_1164.all;

entity ha_beha_en is
port(
A : in BIT;
B : in BIT;
S : out BIT;
C : out BIT
);
end ha_beha_en;


architecture ha_beha_ar of ha_beha_en is
begin
process_beh:process(A,B)
begin
S<= A xor B;
C<=A and B;
end process process_beh;

end ha_beha_ar
;

Here whenever there is a change in the value of a or b the process statements are executed.

Structural modeling:

The implementation of an entity is done through set of interconnected components.

It contains:

  • Signal declaration.

  • Component instances

  • Port maps.

  • Wait statements.

Component declaration:

Syntax:

      component component_name [is]
List_of_interface ports;
end component component_name;

Before instantiating the component it should be declared using component declaration as shown above. Component declaration declares the name of the entity and interface of a component.

Let’s try to understand this by taking the example of full adder using 2 half adder and 1 OR gate.
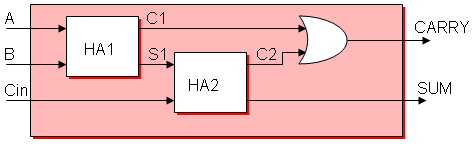
library IEEE;

use IEEE.STD_LOGIC_1164.all
;

entity fa_en is
port(A,B,Cin:in bit; SUM, CARRY:out bit);
end fa_en;


architecture fa_ar of fa_en is

component ha_en
port(A,B:in bit;S,C:out bit);

end component;


signal C1,C2,S1:bit;

begin

HA1:ha_en port map(A,B,S1,C1);
HA2:ha_en port map(S1,Cin,SUM,C2);
CARRY <= C1 or C2;

end fa_ar
;

The program we have written for half adder in dataflow modeling is instantiated as shown above. ha_en is the name of the entity in dataflow modeling. C1, C2, S1 are the signals used for internal connections of the component which are declared using the keyword signal. Port map is used to connect different components as well as connect components to ports of the entity.

Component instantiation is done as follows.

Component_label: component_name port map (signal_list);

Signal_list is the architecture signals which we are connecting to component ports. This can be done in different ways. What we declared above is positional binding. One more type is the named binding. The above can be written as,

HA1:ha_en port map(A => A,B => B, S => S1 ,C => C1 );

HA2:ha_en port map(A => S1,B => Cin, S=> SUM, C => C2);

Test bench:

The correctness of the above program can be checked by writing the test bench.

The test bench is used for generating stimulus for the entity under test. Let’s write a simple test bench for full adder.

library IEEE;

use IEEE.STD_LOGIC_1164.all;

entity tb_en is

end tb_en;

architecture tb_ar of tb_en
is
signal a_i,b_i,c_i,sum_i,carry_i:bit;

begin

eut: entity work.fa_en(fa_ar)
port map(A=>a_i,B=>b_i,Cin=>c_i,SUM=>sum_i,CARRY=>carry_i);

stimulus: process
begin
a_i<='1';b_i<='1';c_i<='1';
wait for 10ns;
a_i<='0';b_i<='1';c_i<='1';
wait for 10ns;
a_i<='1';b_i<='0';c_i<='0';
wait for 10ns;
if now=30ns then
wait;
end if;

end process stimulus;

end tb_ar
;

Here now is a predefined function that returns the current simulation time

What we saw upto this is component instantiation by positional and by name. In this test bench example the entity is directly instantiated. The direct entity instantiation syntax is:

Component_label: entity entity_name (architecture_name)
port map(signal_list);

What is VHDL?

0 comments
VHDL stands for very high-speed integrated circuit hardware description language. Which is one of the programming language used to model a digital system by dataflow, behavioral and structural style of modeling. This language was first introduced in 1981 for the department of Defense (DoD) under the VHSIC programe. In 1983 IBM, Texas instruments and Intermetrics started to develop this language. In 1985 VHDL 7.2 version was released. In 1987 IEEE standardized the language.

Choosing an FPGA

0 comments

When examining the specifications of an FPGA chip, note that they are often divided into configurable logic blocks like slices or logic cells, fixed function logic such as multipliers, and memory resources like embedded block RAM. There are many other FPGA chip components, but these are typically the most important when selecting and comparing FPGAs for a particular application.

Virtex-II

1000

Virtex-II

3000

Spartan-3

1000

Spartan-3

2000

Virtex-5

LX30

Virtex-5

LX50

Virtex-5

LX85

Virtex-5

LX110

Gates

1 million

3 million

1 million

2 million

-----

-----

-----

-----

Flip-Flops

10,240

28,672

15,360

40,960

19,200

28,800

51,840

69,120

LUTs

10,240

28,672

15,360

40,960

19,200

28,800

51,840

69,120

Multipliers

40

96

24

40

32

48

48

64

Block RAM (kb)

720

1,728

432

720

1,152

1,728

3,456

4,608

Table 1. FPGA Resource Specifications for Various Families

Table 1 shows resource specifications used to compare FPGA chips within various Xilinx families. The number of gates has traditionally been a way to compare the size of FPGA chips to ASIC technology, but it does not truly describe the number of individual components inside an FPGA. This is one of the reasons that Xilinx did not specify the number of equivalent system gates for the new Virtex-5 family.

For more information on understanding specifications and how FPGAs work, read the “FPGAs under the Hood white paper.

Top Five Benefits of FPGA Technology

0 comments
  1. Performance
  2. Time to Market
  3. Cost
  4. Reliability
  5. Long-Term Maintenance

  1. Performance – Taking advantage of hardware parallelism, FPGAs exceed the computing power of digital signal processors (DSPs) by breaking the paradigm of sequential execution and accomplishing more per clock cycle. BDTI, a noted analyst and benchmarking firm, released benchmarks showing how FPGAs can deliver many times the processing power per dollar of a DSP solution in some applications.2 Controlling inputs and outputs (I/O) at the hardware level provides faster response times and specialized functionality to closely match application requirements.
  1. Time to market – FPGA technology offers flexibility and rapid prototyping capabilities in the face of increased time-to-market concerns. You can test an idea or concept and verify it in hardware without going through the long fabrication process of custom ASIC design.3 You can then implement incremental changes and iterate on an FPGA design within hours instead of weeks. Commercial off-the-shelf (COTS) hardware is also available with different types of I/O already connected to a user-programmable FPGA chip. The growing availability of high-level software tools decrease the learning curve with layers of abstraction and often include valuable IP cores (prebuilt functions) for advanced control and signal processing.
  1. Cost – The nonrecurring engineering (NRE) expense of custom ASIC design far exceeds that of FPGA-based hardware solutions. The large initial investment in ASICs is easy to justify for OEMs shipping thousands of chips per year, but many end users need custom hardware functionality for the tens to hundreds of systems in development. The very nature of programmable silicon means that there is no cost for fabrication or long lead times for assembly. As system requirements often change over time, the cost of making incremental changes to FPGA designs are quite negligible when compared to the large expense of respinning an ASIC.
  1. Reliability – While software tools provide the programming environment, FPGA circuitry is truly a “hard” implementation of program execution. Processor-based systems often involve several layers of abstraction to help schedule tasks and share resources among multiple processes. The driver layer controls hardware resources and the operating system manages memory and processor bandwidth. For any given processor core, only one instruction can execute at a time, and processor-based systems are continually at risk of time-critical tasks pre-empting one another. FPGAs, which do not use operating systems, minimize reliability concerns with true parallel execution and deterministic hardware dedicated to every task.
  1. Long-term maintenance – As mentioned earlier, FPGA chips are field-upgradable and do not require the time and expense involved with ASIC redesign. Digital communication protocols, for example, have specifications that can change over time, and ASIC-based interfaces may cause maintenance and forward compatibility challenges. Being reconfigurable, FPGA chips are able to keep up with future modifications that might be necessary. As a product or system matures, you can make functional enhancements without spending time redesigning hardware or modifying the board layout.

Introduction to FPGA

0 comments

At the highest level, FPGAs are reprogrammable silicon chips. Using prebuilt logic blocks and programmable routing resources, you can configure these chips to implement custom hardware functionality without ever having to pick up a breadboard or soldering iron. You develop digital computing tasks in software and compile them down to a configuration file or bitstream that contains information on how the components should be wired together. In addition, FPGAs are completely reconfigurable and instantly take on a brand new “personality” when you recompile a different configuration of circuitry. In the past, FPGA technology was only available to engineers with a deep understanding of digital hardware design. The rise of high-level design tools, however, is changing the rules of FPGA programming, with new technologies that convert graphical block diagrams or even C code into digital hardware circuitry.

FPGA chip adoption across all industries is driven by the fact that FPGAs combine the best parts of ASICs and processor-based systems. FPGAs provide hardware-timed speed and reliability, but they do not require high volumes to justify the large upfront expense of custom ASIC design. Reprogrammable silicon also has the same flexibility of software running on a processor-based system, but it is not limited by the number of processing cores available. Unlike processors, FPGAs are truly parallel in nature so different processing operations do not have to compete for the same resources. Each independent processing task is assigned to a dedicated section of the chip, and can function autonomously without any influence from other logic blocks. As a result, the performance of one part of the application is not affected when additional processing is added.

Electronic Devices and Amplifier Circuits with MATLAB Applications

0 comments
Electronic Devices and Amplifier Circuits with MATLAB Applications
This book is an undergraduate level textbook presenting a thorough discussion of state-of-the art electronic devices. It is self-contained; it begins with an introduction to solid state semiconductor devices. The prerequisites for this text are first year calculus and physics, and a two-semester course in circuit analysis including the fundamental theorems and the Laplace transformation. No previous knowledge of MATLAB®is required; the material in Appendix A and the inexpensive MATLAB Student Version is all the reader needs to get going. This text can also be used without MATLAB. This is our fourth electrical and computer engineering-based text with MATLAB applications.
http://letitbit.net/download/0e0969809412/electronic-devices.rar.html
http://depositfiles.com/files/nqanoegqd
http://uploading.com/files/SMPGEL08/electronic_devices.rar.html
 
footer